Standard RPi boards (not Compute Modules) accept a single MIPI camera, but Arducam offers solutions to take multiple.
Raspberry Pi Multi Camera Adapter
We released the first revision that supported the 5MP V1.3 Pi camera multiplexing in 2015. Later, we’ve released a newer adapter to add 8MP support in 2018.
Now, you can even use the latest IMX477 High Quality camera modules with it.
Raspberry Pi Multiple Camera Projects
During these years, the users have built many Raspberry Pi multiple camera projects with this adapter, and the following blogs show you 6 of them.
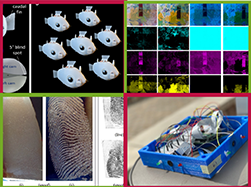
6 Exciting Raspberry Pi Multiple Camera Applications: From Under the Sea to up in the Space
The Raspberry Pi is a powerful single-board computer to help you do proof-of-concept of your ideas. To make the Raspberry Pi smart enough to realize what we want, we’ll need it to sense the world. Which sense has the biggest impact on our everyday lives? I believe it’s vision. Camera builds the vision for the […]
Arducam Camarray Multiple Camera Solutions
In 2019, we had another breakthrough in making the multiple cameras connected work synchronized, which is now the Camarray series. The new solution can merge and resize video inputs from multiple cameras to simulate the resolution and aspect ratio of a single camera that the native driver expects or bypass the limits of the native driver to fully display multiple video inputs with the Arducam V4L2 driver.
As we’ve made it more robust, versatile, and complete for the Raspberry Pi multiple camera solutions, the product released in 2015 has fulfilled its purposes and been replaced by its successors introduced in the following two blogs.
Recommended Further Reading

Introducing Camarray: Arducam’s New Solution to Multiple Cameras on Embedded Systems and Edge Devices
Preface As one of the leading companies that pioneers in multiple cameras for popular embedded systems, Arducam now releases the new multi-camera solutions – named Camarray – which allows you to connect and sync up to 4 MIPI camera modules on the Raspberry Pi, Jetson Nano, and Jetson Xavier NX or even more platforms. Read […]
Arducam V2.1 Multi-Camera Adapter Board for Raspberry Pi 8MP Camera IMX219
Introduction Since the old multi-camera adapter board doesn’t work with Raspberry Pi 8MP IMX219 pi camera due to the camera driver issue. Now Arducam team designed upgrade V2.1 multi-camera adapter board for both 5MP and 8MP pi cameras. Consider that the high speed CSI camera MIPI signal integrity is sensitive to long cable connection, the […]
What do you want to do with multiple cameras on Raspberry Pi?
Leave your comments below!
Take me to the old blog (2015) instead
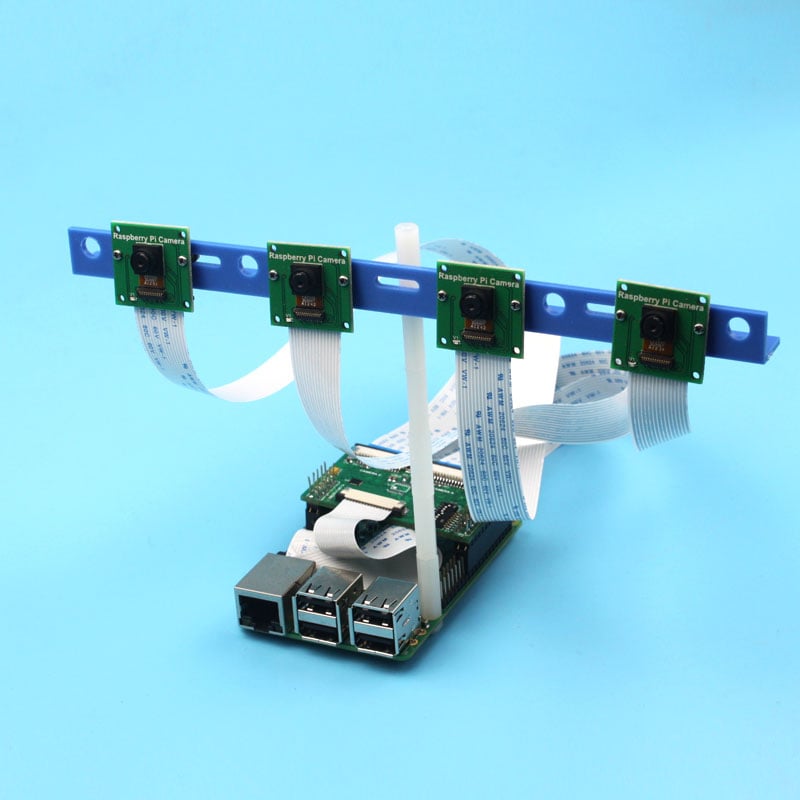
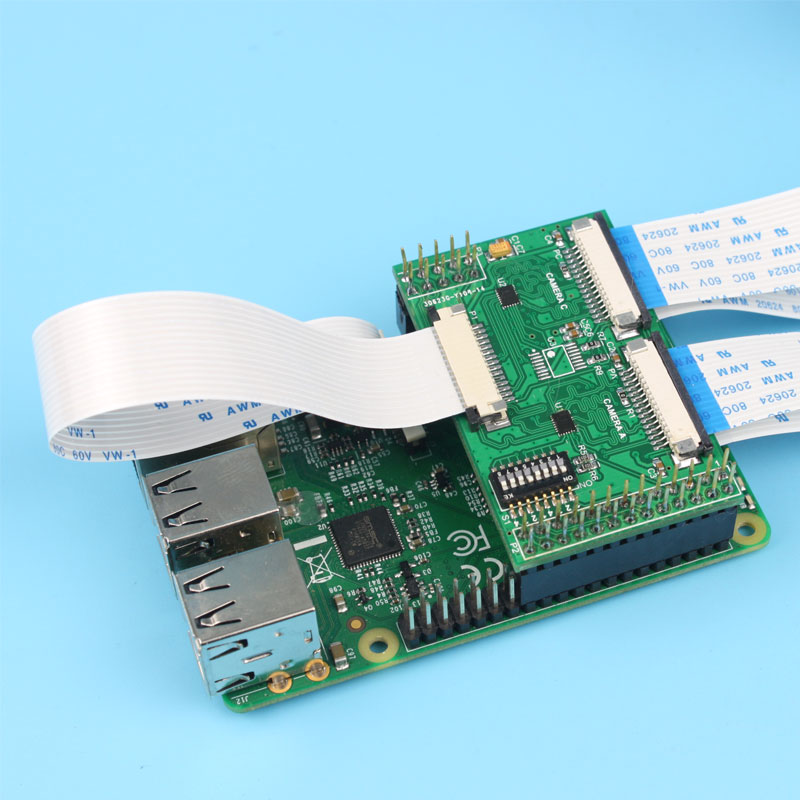
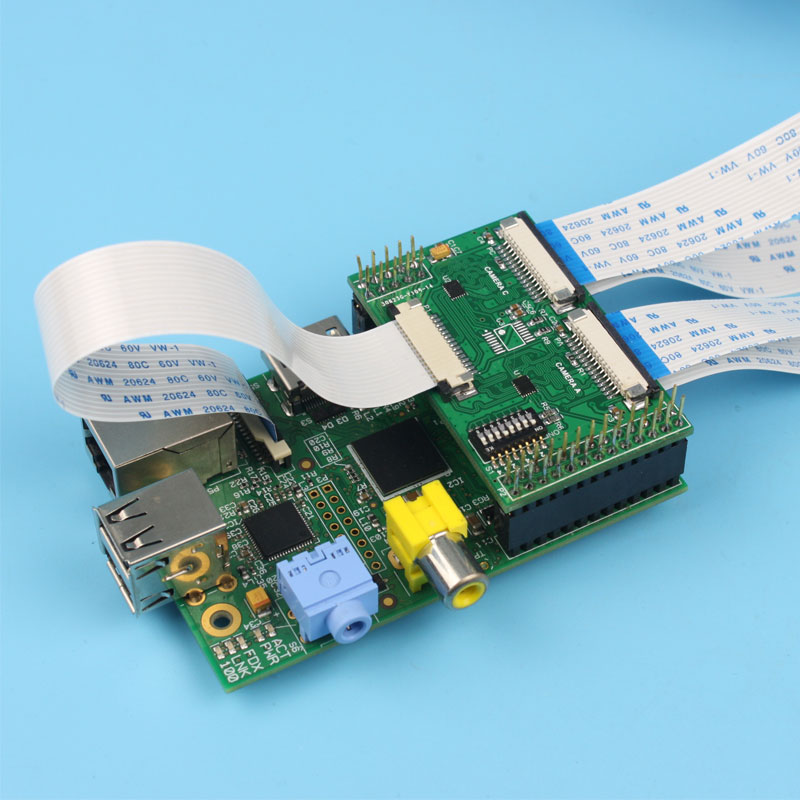
The Raspberry Pi multi-camera adapter module is designed to connect more than one camera to a single CSI camera port on the Raspberry Pi board. Each adapter board can connect up to 4 cameras and the user can stack up to 4 adapter boards, which means up to 16 cameras on a single Raspberry Pi board.
Please note that this Raspberry Pi multi-camera adapter board is a nascent product which may have some stability issues and limitations because of the cable’s signal integrity and RPi’s closed source video core libraries, so use it at your own risk.
Application
- IoT cameras
- Robot cameras
- Wildlife cameras
- 3D scanner
Features
- Accommodate 4 Raspberry Pi cameras on a multi-camera adapter board
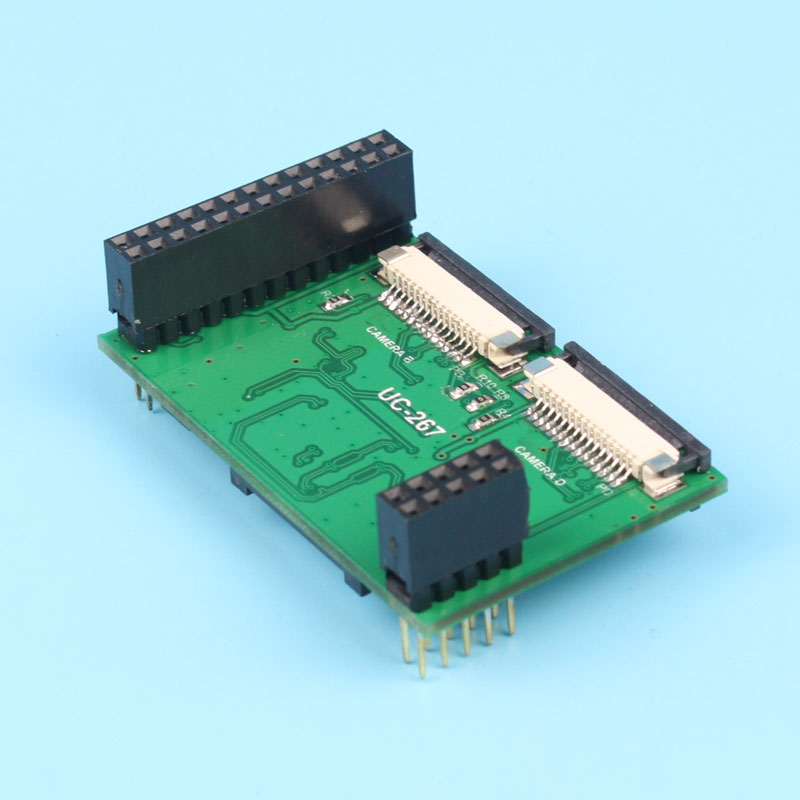
- Stackable and maxim cascade 4 adapter boards
- 3 GPIOs required for multiplexing on one adapter board, 5 GPIOs for two adapter board, 9 GPIOs for four adapter board
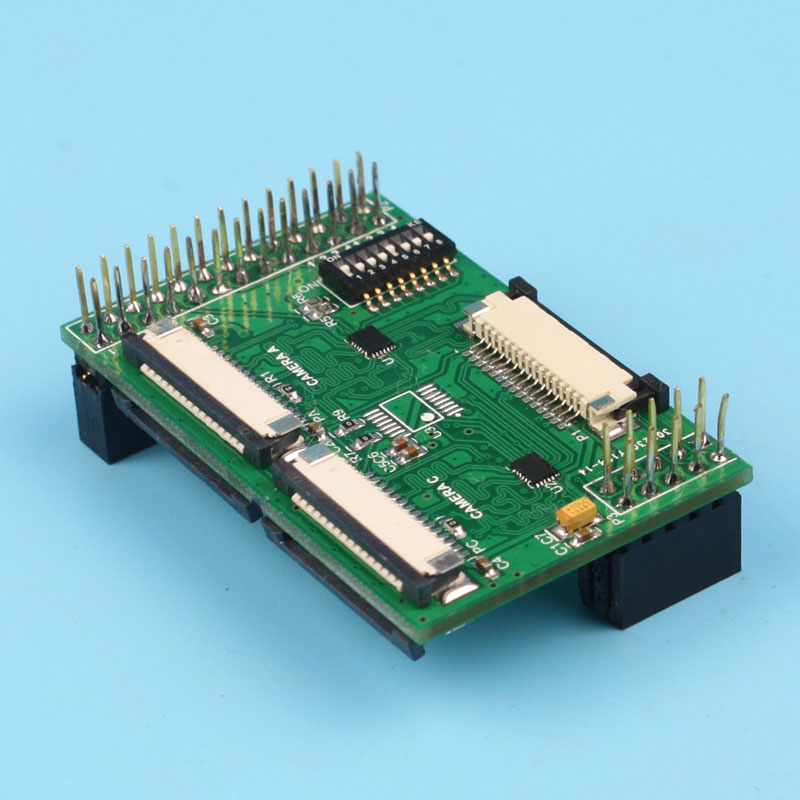
- All camera ports are FFC (flexible flat cable) connectors
- DIP switches for easy stack up configuration
- Support Raspberry Pi A/B/B+ and Pi 2.
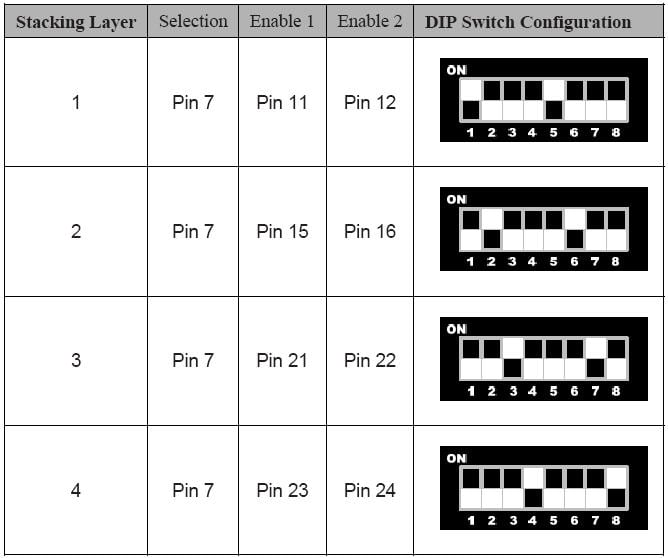
Pin Configuration
DIP switches are used here to easily stack up configuration. When only one multi-camera adapter board is used, the switches 1and 5 should be switched to ON position. If two multi-camera adapter boards are used, the downside board should be switched 1 and 5 to ON and upside board should be switched 2 and 6 to ON position, and if 3 or 4 multi-camera adapter boards are used together each board layer should be configured as Table 1 shown.
Table 1 Pin Configuration
Operations
For proper operation, only one camera should be enabled at a time. In case of only one multi-camera adapter board is used, driving Pin12 HIGH and driving Pin11, Pin7 to LOW to enable camera A on the adapter board. Enable camera B, C, and D, please refer the Table 2 for camera selection configuration. To disable all cameras on one adapter board, Enable 1 and Enable 2 signals should be toggled HIGH. Care should be taken so that it is not allowed to drive Enable 1 and Enable 2 LOW at the same time. When connecting more than two multi-camera adapter boards, only one of the cameras can be enabled by enabling the desired camera on one adapter board and disable all the cameras on the rest of adapter boards.
Table 2 Camera Selection Configuration
| Camera Selection Configuration | Selection | Enable 1 | Enable 2 |
| A | 0 | 0 | 1 |
| B | 1 | 0 | 1 |
| C | 0 | 1 | 0 |
| D | 1 | 1 | 0 |
| No Camera | X | 1 | 1 |
| Error | X | 0 | 0 |
(X: don’t care)
Software Demonstration
Before using it, required dependency python-rpi.gpio have to be installed with
sudo apt-get install python-rpi.gpio
the command from the Terminal. Then run the following code for a quick demo.
import RPi.GPIO as gp
import os

gp.setwarnings(False)
gp.setmode(gp.BOARD)

gp.setup(7, gp.OUT)
gp.setup(11, gp.OUT)
gp.setup(12, gp.OUT)

gp.setup(15, gp.OUT)
gp.setup(16, gp.OUT)
gp.setup(21, gp.OUT)
gp.setup(22, gp.OUT)

gp.output(11, True)
gp.output(12, True)
gp.output(15, True)
gp.output(16, True)
gp.output(21, True)
gp.output(22, True)

def main():
    gp.output(7, False)
    gp.output(11, False)
    gp.output(12, True)
    capture(1)

    gp.output(7, True)
    gp.output(11, False)
    gp.output(12, True)
    capture(2)

    gp.output(7, False)
    gp.output(11, True)
    gp.output(12, False)
    capture(3)

    gp.output(7, True)
    gp.output(11, True)
    gp.output(12, False)
    capture(4)

def capture(cam):
    cmd = "raspistill -o capture_%d.jpg" % cam
    os.system(cmd)

if __name__ == "__main__":
    main()

    gp.output(7, False)
    gp.output(11, False)
    gp.output(12, True)
Due to normal camera operations, users can still use raspistill or raspivid command to take photos or videos. By controlling the GPIOs according to Table 1 and Table 2 configuration, users can take photos or videos by switching between different cameras. Have fun!
Further Reading
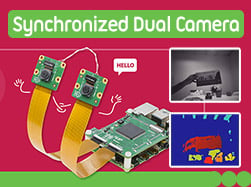
Wanna Use Synchronized Dual Camera for Raspberry Pi 4 or Stereo Camera HAT for Pi 3B+/3? Arducam Makes Them All Come True
Preface Standard Raspberry Pi, like the Pi 4, only offers a single CSI camera connector, but people would love multiple cameras for 3D applications. Arducam has figured out a way to connect the sync two cameras at the same time in 2019, and the following blog tells you all about it. A year later in […]

A Quad-Camera System with The Raspberry Pi Compute Module 3/3+
The Difference Between A Compute Module and A Raspberry Pi Most of us are familiar with the standard Raspberry Pi models, such as the Raspberry Pi 2, 3, 3B+, 4. Aside from these models for the consumer end, there is another lineup of the Raspberry Pi family intended for industrial application, and that’s the Raspberry […]


Do you sell the adapter board?
How can I buy this module ? I’m interested to have one.
Hello,
I would like to know if this multi-camera module is also compatible with Jetson Nano products ?
(https://developer.nvidia.com/embedded/learn/get-started-jetson-nano-devkit) or if it has to be connected to a raspberry pi ?
Regards
Hi, I would like to buy camera adapter for raspberry pi 4. Can you please confirm the availability. Thank you
I notice that it says “one camera at a time”. I want to connect as many cans as possible (i.e. 16) and take a simultaneous picture with all of them. My application is slow moving, do I might be able to take sequential pics from all the cameras if switching time is small: ideally not much more than about 5 milliseconds, based on getting all 16 images in less than 100 milliseconds. Does anyone know if that’s likely to be possible?
Hello, I need a cable length of 70 feet between the cameras and the Raspberry. Will that work with the multi-camera adapter? I can use Cat 7 cable for extend.
The signal integrity degrades a lot at 70 feet, and we’ve only had the extension tested with 10 meters (about 33 feet) HDMI cable
@Keith, You will need to use the USB ports or use the approach of using IP Cameras.
How fast is the switching latency? Would it be possible to quickly alternate between camera inputs to feed the made pictures into an obstacle avoidance ai?
Is it possible to buy this module?
The older version mentioned in this post is end of life, but the upgraded version is available on Amazon.com and uctronics.com
The Cameras and module requires power. Will the normal raspberry pi power adapter work (5v 3000mA)?
This board is so much more user-friendly. The i2c requirements on the newest boards tend to throw errors if the environment isn’t perfectly set-up. I just spent a couple of hours trying to get the v2.1 board to work with the RPi4 to no avail, then within three minutes got this board up and running successfully.
I wish this design had been maintained.
Where can I buy this module? Could somebody point me to it?
The older version mentioned in this post is end of life, but the upgraded version is available on Amazon.com and uctronics.com
Very interested in supporting your product. I am a application developer on pi.
Please get back to me.
David
I would like to build a bird (Bat, Insect) detection and tracking system, based on a wide angle detection cam and a tele cam. of course also two servo’s and a raspberry pi and ssddrive. the idea is to put the unit behind the window facing my garden with nesting boxes and get footage of the birds entering those boxes and leaving.
your ideas are welcome 🙂
regards,
Wilfried
Hi Wilfried, there are actually multiple choices, I’ve forwarded your message to our tech team, you will get an email reply with recommendations soon.
Is it possible to run different types of cameras at the same time, I would like to take capture an image using camera connected to a Pi and capture a thermal image at the same time with a second camera.
Trying to build a two camera dashcam/security camera (one facing out while driving, other facing in when parked) using pi zero 2, ArduCam uc-444, two 8MP Pi V2 cameras and RTC Pizero addon for time stamps. RTC has passthrough header. Both modules work without the other, but not when stacked (Pi+RTC+uc-444). RTC uses i2c 0x68, cameras use 0x70. other i2c channels in use are 0x10 and 0x64.
Any suggestions on what is interfering?