
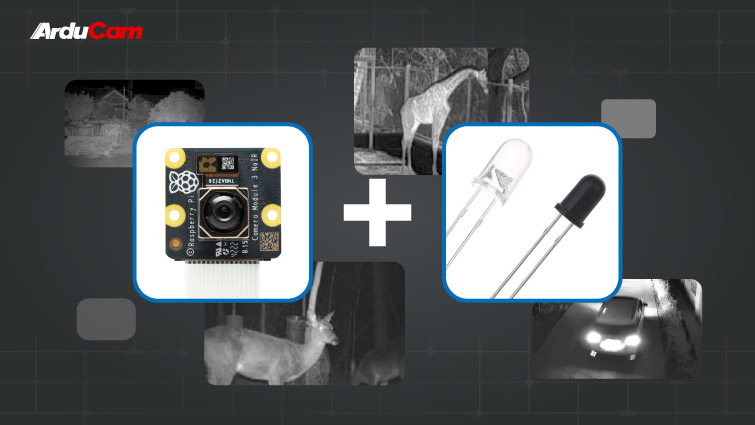
Raspberry Pi’s new camera module v3 is finally out.
It’s got a fairly competent sensor, the long-awaited autofocus, and also comes at pretty unbeatable prices, just like its predecessors.
However, is it as perfect as it appears? Can you use it as an all-rounder for all your projects?
Before you decide it’s a 10/10 and crown it the best RPi camera module of all time, let’s take a deeper look.
Camera Module V3 in a Nutshell
To give you a quick grip, here’s the gist of the new CM v3 series:
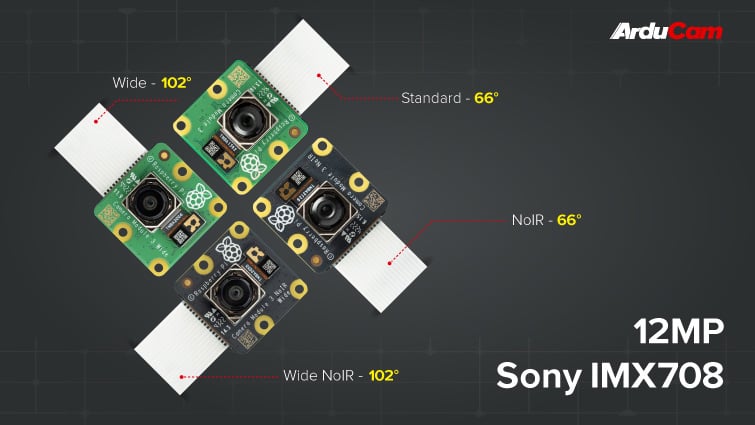
- The V3 cameras offer 4 variants: Standard, Wide, NoIR, and NoIR Wide.
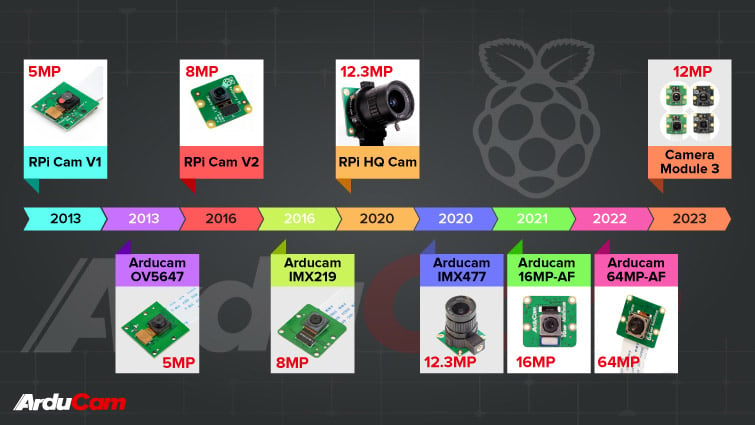
- The entire v3 line is based on the 12MP Sony IMX708 CMOS sensor. According to Eben, they picked this sensor years ago.
- IMX708 is a rolling shutter sensor, which means all V3 cameras have rolling shutters.
- All V3 cameras have autofocus.
- For $25, you can get the Standard & NoIR variant, and the Wide and NoIR Wide are available at $35.
- The autofocus is achieved by a mixture of PDAF and CDAF.
- FoV for both V3 Standard and V3 NoIR comes at 66° (horizontal), yet for the two wide versions, it’s 102° (horizontal).
- They have a 5cm MOD (minimum focus distance) for both Standard and NoIR, and 10cm for Wide & NoIR Wide.
- 4608 x 2592 is the highest resolution you can get for still images, 1080p50 max for video.
- All cameras support capturing in HDR.
- All 4 cameras have the same board size as V1.3 and V2 cameras.
- The v3 line works with all Raspberry Pi models, except for Raspberry Pi 400.
- To use the V3 cameras with Pi zero models, you need additional camera cables.
- All V3 cameras are compatible with both libcamera & Picamera2, but they no longer work with legacy software (raspivid, raspistill, etc.).
- The camera module v3 line will stay in production for at least 7 years (until Jan. 2030).
You can find sample photos from Camera Module 3’s official page (scroll to the bottom), Les pounder’s review article, and Jeff Geerling’s hands-on video.
Camera Module 3 Has Got the Same 2-Lane MIPI Connection
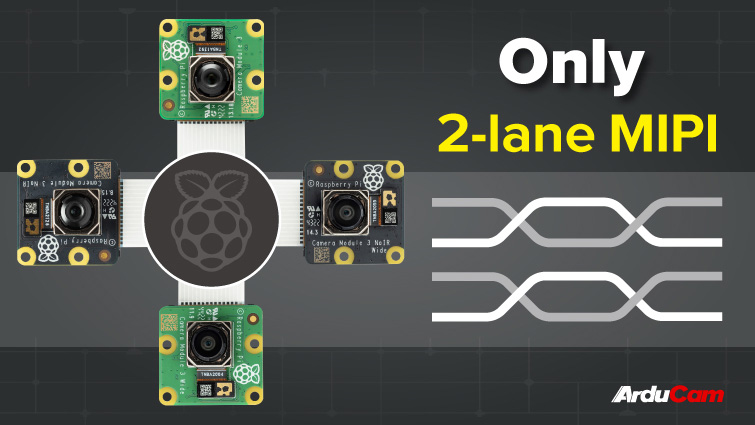
All official camera modules (V1.3/V2/HQ), including the v3 series, only offer 2-lane MIPI connections.
The transferring rate (around 2 Gbps) of a 2-lane connection and the processing power of the latest Pi models are sufficient enough for the v3 cameras, but if you use them with a non-RPi board that offers 2+ MIPI lanes, the bandwidth cap can be a huge disadvantage.
With HDR, You Only Got a Quarter of the Resolution
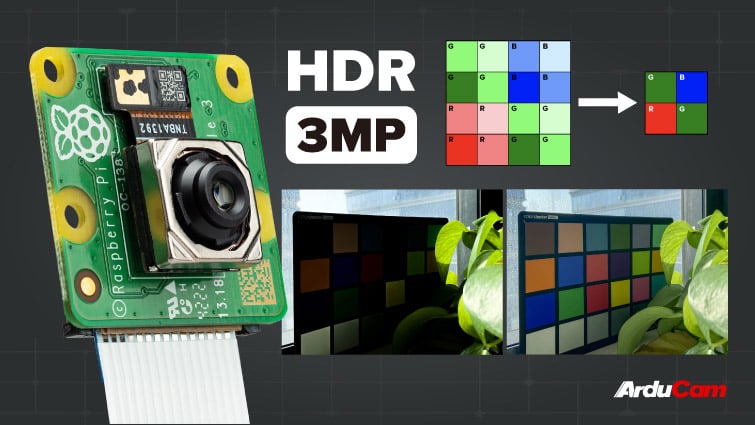
You can use the new v3 camera to capture both HDR images and videos, and in HDR mode, the sensor achieves High Dynamic Range by doing pixel synthesis where 4 pixels on the same channel (R, G, or B) with different exposures (in the IMX708 case, long, middle and short exposures) are combined into a large one after the readout.
Kinda like this:
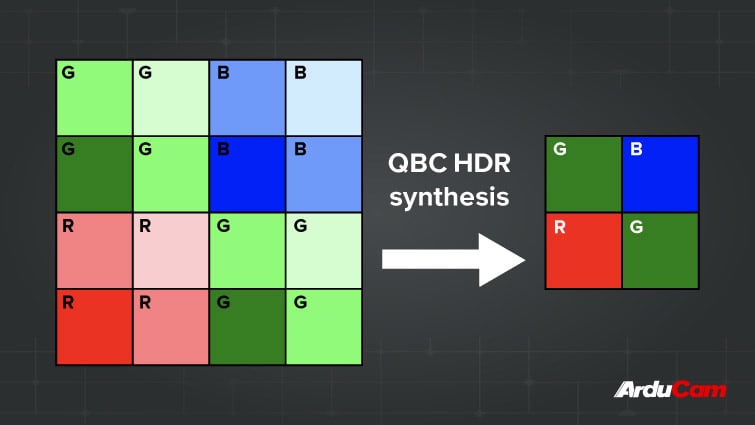
Since the IMX708 is a quad Bayer sensor, its HDR output is limited to 3MP. This is also confirmed by David Plowman, one of the main engineers behind these V3 modules.
From some of the sample photos taken by the foundation, and Les Pounder (Tom’s Hardware), you can tell that the HDR images are more vibrant and preserve more details in both the shadows and highlights.
With the latest software, it’s super easy to capture HDR videos with the new V3 cameras, this can come in really handy for scenes with bright highlights and dark shadows.
NoIR & NoIR Wide: Things to Always Keep in Mind
1. Additional IR LEDs are required
Both NoIR and NoIR Wide have only a camera module and a 15-pin ribbon cable in the box.
If you tend to use the NoIR variants in dark environments or for night vision applications, external illumination is needed (preferably 850nm/950nm IR LEDs).
2. Infrared pollution in broad daylight
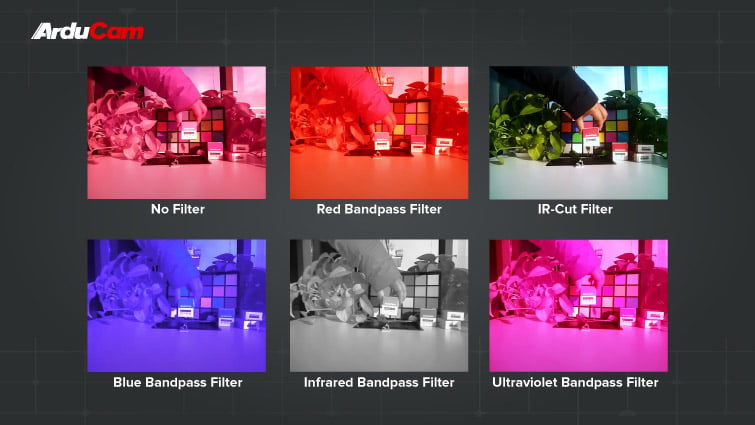
Without the IR cut filter, the IMX708 sensor is capable of capturing a wider wavelength range than the standard versions.
If you use them in environments that have strong sunlight, the final image/video you get may appear with a reddish tint (caused by Infrared).
3. Switchable IR-Cut is achievable
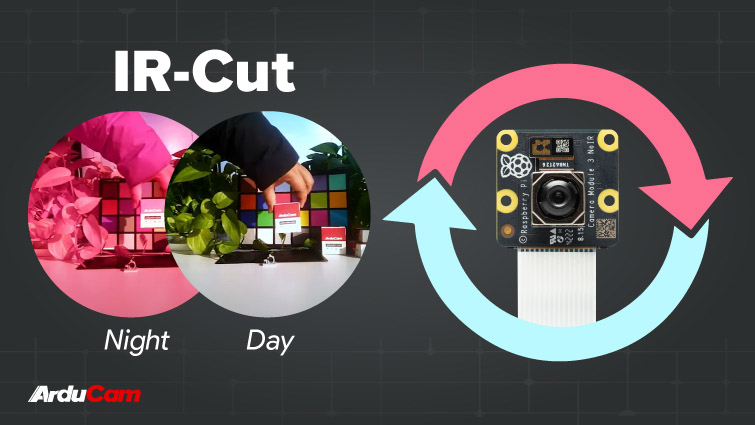
A motorized IR-Cut filter, a light sensor, and IR LEDs are some of the popular fixes we did with the previous NoIR Pi cameras.
The onboard light sensor controls when the IR-Cut filter and IR LEDs should be turned on/off, the IR-cut filter is switched on throughout the day and automatically goes off at night with the LEDs on.
This makes it possible for the NoIR version to work 24×7 with perfect captures under daylight and great night vision abilities in the dark.
We are pretty confident about applying the same fixes to the two V3 NoIR cameras.
Using Camera Module V3 on Nvidia Jetson Boards?
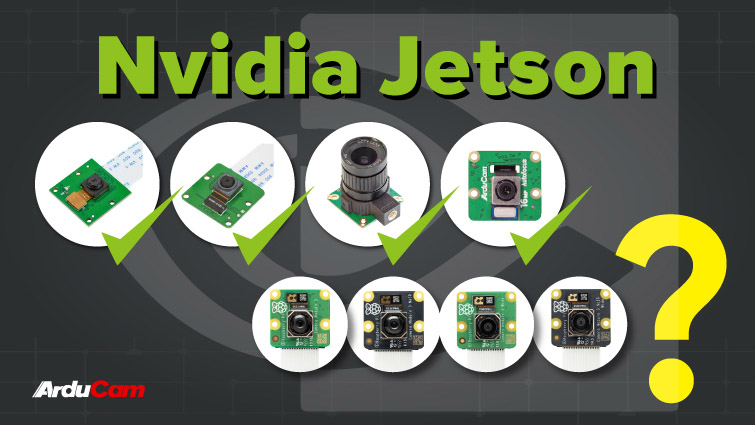
There have been no official support or statements about adding such support from both Raspberry Pi and Nvidia, but we’ve always been on the front lines of getting RPi native cameras to Nvidia Jetson boards, and our 16MP-AF series and the 64MP-AF are available too.
The V3 camera series would be a great addition and offer immeasurable value to the Jetson ecosystem, and on that note, it’s only a matter of time.
Unavoidable Drawbacks of Autofocus for Certain Types of Applications
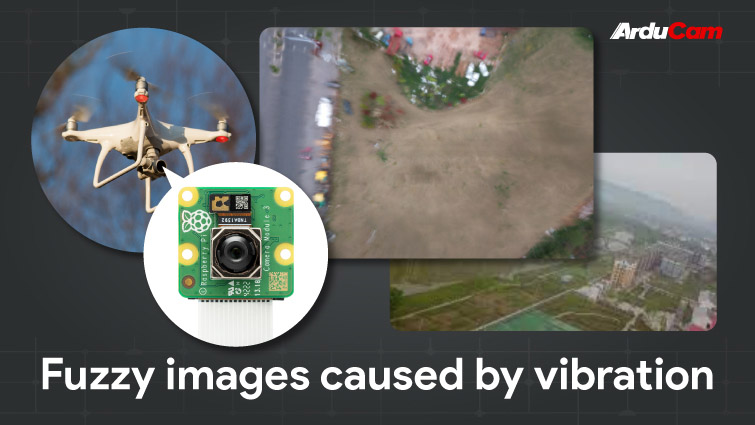
Under certain circumstances, autofocus can actually be trouble.
The tiny focus motor in the lens works perfectly great when the camera module is positioned in an immobile fashion, but if you were to use it for UAV, or robot-related projects where there could be environmental disturbances, any sort of quivering and vibration would greatly mess up the results for you.
Compatibility with V1/V2 Camera Cases
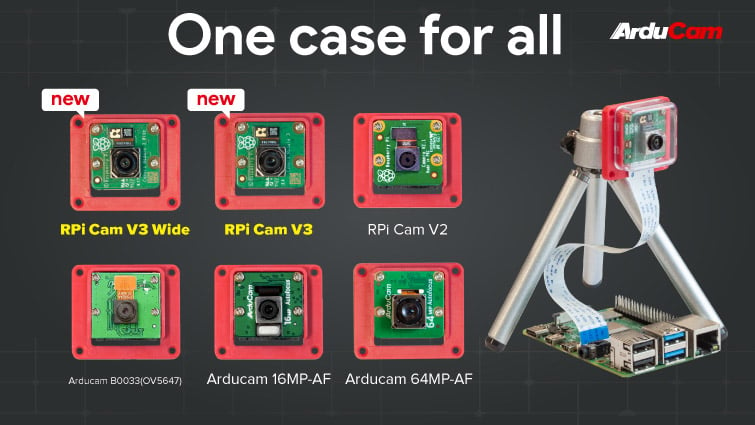
Mounting the camera is another big problem for many.
Due to the bulky lens design, the V3 camera can not fit into the official Pi zero case, and neither will it work with most of the popular cases made for V1 and V2 cameras.
Since the V3 camera series has a similar lens layout as our 16MP-AF and 64MP-AF, and with the same mounting holes, the camera cases we created for them can seamlessly house the V3 cameras!
Kevin McAleer has also made another cool 3D-printed Giraffe camera mount for it.
Accessories: Extension Cable, Multiplexing, Pan-Tilt Bracket, etc.

Can I use super-long cables?
How about getting multiple V3 cameras to stream or capture on a Raspberry Pi 4?
What if I want to put the camera modules underwater?
Are there other ways to increase the FoV?
Is it too much if I want to turn them into USB cameras?
What about exchangeable lenses?
The same questions being asked for old Pi cameras will eventually come up on the V3 series, but as a matter of fact, there has always been only one single request: how can we get more out of the V3 camera modules?
Luckily, we are better prepared this time.
The Conclusion: Camera Module 3 Sets a New Paradigm for RPi Cameras
It’s encouraging to witness how the foundation evolves with its community in certain forms.
Raspberry Pi sure did a great job with the V3 cameras: a modern sensor, HDR, and incredibly amazing PDAF (Phase Detection Autofocus) along with A+ software support.
With the V3 series taking the lead, It’ll be another great year with more and better camera innovations.
Footnote
- Images by John Lee, our Chief Design Officer.


I’ve got the 16MP-AF, how does this compare to that? Worth the upgrade?
Hi Doug, we’ve been evaluating it, there’s gonna be a super detailed comparison soon!
Looking forward to that comparison.
Appreciate the honest reviews! Almost went for the 64mp but wanted Zero compatibility. So pleased to see this module, and you’re intentions to do an improved No-IR version.
Yep. Everything needs to be reconsidered when it comes to Pi Zeros.
I would be happy about an option with manual adjustable focus in order to be able to use them on vibrating vehicles like drones.
Hi Hel, that sounds like an interesting option!
Thanks for sharing informative article.
Hi Arun, glad you got something out of it.
I’ve got your 64MP camera. It requires custom installation of 64mp_pi_hawk_eye_kernel_driver and also your custom builds of libcamera-dev and libcamera-apps.
Now that the default Raspbian distribution of libcamera-dev and libcamera-apps includes autofocus options, do you expect that I will be able to go back to using that repository along with your custom driver for the 64MP camera?
Hi William, we will catch up with the official repo in our upcoming updates, including new AF features.
I’m mostly interested in not having to install a separate package from the standard distribution. If you created a repository so that the files could be retrieved and installed in the normal apt update and apt upgrade process I might have less resistance to running custom packages.
Good point! It’s hard to admit but true. This is also the ultimate goal we set and what we’ve been trying to accomplish with our Pi camera lines.
I’ve got both Arducam 64mp and just received R pi camera module 3. I’ve been trying to use Arducam ever since I’ve got it last summer with no luck. There are always errors with drivers and half-baked solutions and to this day I haven’t got it to work. On the other hand Camera Module 3 worked immediately as soon as I plugged it in, nice, clean and no errors, no hacks or workarounds. If you do want to compete with it, you need to sort out the drivers PROPERLY and keep them updated.
Hi Vojislav, 100% on the experience part! Did you try contacting our support team when you run into issues?
Where is the best place to get in contact? So far I have got no responses to any posts.
We’ve reached out to Octoprint, it’s coming soon!
Wow, you guys at Arducam sure know how to bite the hand that feeds, huh? Without Raspberry Pi, you wouldn’t exist, I imagine. I realize your objective is to sell as much cheap crap as possible, but take a step back and consider the tone and ingratitude in your post. The fact is, while your hardware may have a feature or two the Pi Camera Module 3 doesn’t, your software ecosystem is a joke. People who understand anything about Linux and how repos work don’t like the idea of having to run custom kernels and custom drivers from Arducam. It’s not a good look to criticize a much bigger fish with a much more cogent software approach when your own house is not in order. I regret buying anything from you.
Hi Matt, thank you for calling us out. Our cameras still have a long way to go, and we will never try to deny or sugar-coat this.
I was only trying to be as unfiltered and unbiased as possible on the subject (the V3 camera series), I never meant to disrespect the foundation or the new cameras, and here at Arducam, we were just as excited as everyone else in the RPi community.
If this is perceived as ungrateful or impudent to you, I’ll do better in my future articles.
thank you for the info & ideas presented in this thread. i would like to suggest to have a camera carrier board for the cm4 with minimal footprint that is only coverying the cm4 module it self. this will solve a lof of issues:
– stability for drone, action cameras and movable equipment (ribbon is not stable for such use cases)
– minimal footprint, yet it is not limited to the Pi Zero limitation in terms of memory and CPU
– no auto focus, it is meant for movable use cases
– M12 lenses
Hi Abu, that sounds super practical to me, and the points are pretty solid too! And if you can also keep the cost down to a certain level, it’d be a fun board for many! I’ll let our R&D team know about this.
i purchased a raspberry pi camera Module V3. i have tried my best to enable it and run this camera module on octopi but couldn’t. plz can you help me with this?
Hi Habil, as far as I know, V3 support for OctoPi is still in progress. I’ve seen discussions on both the OctoPi repo and forum, I’m sure those behind OctoPi have been working on it, please be patient.
Interesting article, and timely for me. I have an Arducam 64mp Hawkeye that was working well for about 6 months, but just a few days ago, the “focus” motor apparently died. It’s stuck on a setting of 68, and all attempts to change focus are ignored. I’ve contacted Arducam, but awaiting a response. In the meantime, I have been watching the new V3 and considering it. Although the 64mp sounds incredible, for my streaming video application, I believe it’s limited to just 16mp.
With the Arducam 64mp (before it died), I could set focus ONCE and then leave it. Are you saying that the new V3 from Raspberry Pi is ALWAYS in auto-focus mode? Or can that focus motor be set to a fixed position also, like the 64mp?
Hi Dale, Did you do anything else to the module? Or to the OS? Quite a strange issue. As for V3, you can do the same (control the focus and set it to a certain value).