Arducam Camera Modules Suitable for this tutorial
This tutorial is suitable for Arducam camera modules for Raspberry Pi that runs with a V4L2 driver.
OV9281 for Raspberry Pi
- Arducam Camarray OV9281 Camera Module
- Arducam Camarray OV9281 1MP*2 Stereo Camera Board
- Arducam Camarray OV9281 1MP*2 Stereo Camera Bundle (with Camarray HAT)
- Arducam Camarray OV9281 1MP*4 Quadrascopic Camera Bundle (with Camarray HAT)
OV2311 for Raspberry Pi
- Arducam Camarray OV2311 Camera Module
- Arducam Camarray OV2311 2MP*2 Stereo Camera Board
AR1335 for Raspberry Pi
- Arducam 13MP OBISP MIPI Camera for Raspberry Pi
AR0230 for Raspberry Pi
- Arducam 2MP HDR OBISP MIPI Camera for Raspberry Pi
Prerequites
Make sure you have already successfully installed the V4L2 driver and utilities, and the camera is running.
sudo apt install v4l-utilssudo apt-get install libv4l-dev && sudo pip install v4l2captureRun the following command to get available image formats.
v4l2-ctl --device /dev/video0 --list-formats-extYou will get a results with supported formats by video source.
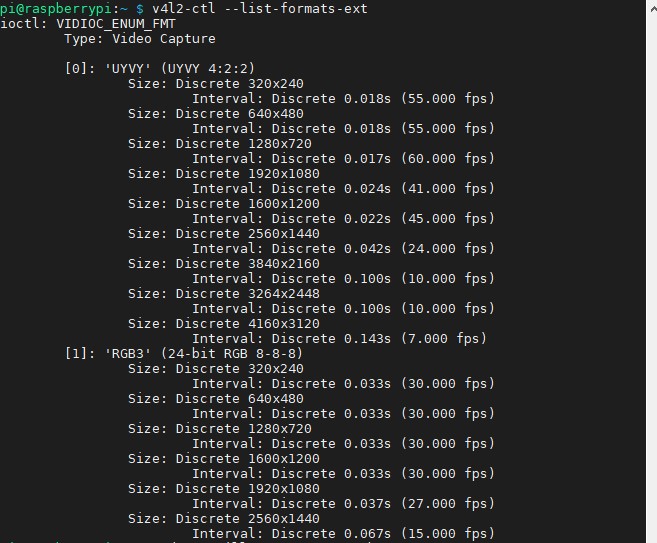
We will need the image width and height in the following scripts. For example, if you want to capture the frames of the AR1335 in full resolution, the image width is 4160, and the image height is 3120.
Example
This example shows how to use OpenCV to capture images of a single OV9281 camera module. If you are using another camera module, you can modify the code to match the camera you have on hand. Be careful with keeping the same indent when you modify it.
In Line 23-24:
From our last step, we get the video modes supported by the camera module. Fill in the following with the ones you need.
image_width = $YOUR_TARGET_WIDTH_FROM_LIST_FORMAT
image_height = $YOUR_TARGET_HEIGHT_FROM_LIST_FORMAT
In line 27:
text = "$WHATEVER_YOU_LIKEIn line 57:
Modify the video node is your camera is somehow not assigned to video0.
video = v4l2capture.Video_device("/dev/video0")In line 74:
cv2.imshow("$WHATEVER_YOU_LIKE",image_data)In Line 28-29, Line 76 and Line 80:
The example uses “t” to capture and “q” to exit by default. Modify these parameters if you’d like to use other keys.
#!/usr/bin/python
#
# python-v4l2capture
#
# This file is an example of how to capture a picture with
# python-v4l2capture.
#
# 2009, 2010 Fredrik Portstrom
#
# I, the copyright holder of this file, hereby release it into the
# public domain. This applies worldwide. In case this is not legally
# possible: I grant anyone the right to use this work for any
# purpose, without any conditions, unless such conditions are
# required by law.

import Image #pip install http://effbot.org/downloads/Imaging-1.1.6.tar.gz
import select
import v4l2capture #sudo apt-get install libv4l-dev && sudo pip install v4l2capture
import cv2
import numpy as np
import time
i = 0
image_width = 1280
image_height = 800

def print_message():
    text = "This demo is used for Arducam ov9281 camera\r\n\
    press 't' to save image\r\n\
    press 'q' to exit demo\r\n"
    print(text)
def align_down(size, align):
    return (size & ~((align)-1))
def align_up(size, align):
    return align_down(size + align - 1, align)
'''
convert to real 10 bit
'''
def remove_padding(data, width, height, bit_width):
    buff = np.frombuffer(data, np.uint8)
    real_width = int(width / 8 * bit_width)
    align_width = align_up(real_width, 32)
    align_height = align_up(height, 16)
    buff = buff.reshape(align_height, align_width)
    buff = buff[:height, :real_width]
    buff = buff.reshape(height, real_width)
 #   print(buff)
    buff = buff.astype(np.uint16) << 2
    # now convert to real 10 bit camera signal
    for byte in range(4):
        buff[:, byte::5] |= ((buff[:, 4::5] >> ((4 - byte) * 2)) & 0b11)
    # delete the unused pix
    buff = np.delete(buff, np.s_[4::5], 1)
    return buff
if __name__ == "__main__":
    print_message()
    # Open the video device.
    video = v4l2capture.Video_device("/dev/video0")
    # Create a buffer to store image data in. This must be done before
    # calling 'start' if v4l2capture is compiled with libv4l2. Otherwise
    # raises IOError.
    video.create_buffers(3)
    # Send the buffer to the device. Some devices require this to be done
    # before calling 'start'.
    video.queue_all_buffers()
    # Start the device. This lights the LED if it's a camera that has one.
    video.start()
    select.select((video,), (), ())# Wait for the device to fill the buffer.
    while True:
        image_data = video.read_and_queue()
        image_data = remove_padding(image_data,image_width,image_height,10)
        image_data = cv2.cvtColor(image_data,46)
        image_data = image_data>>2
        image_data = image_data.astype(np.uint8)
        cv2.imshow("Arudcam OV9281 Preview",image_data)
        key= cv2.waitKey(delay=5)
        if key == ord('t'):
            cv2.imwrite(str(image_width)+"x"+str(image_height)+"_"+str(i)+'.jpg',image_data)
            i+=1
            print("Save image OK.")
        if key == ord('q') or key == 27:
            break
    cv2.destroyAllWindows()
    video.close()
