Introduction
Arducam team designed a simple and ready to use userland MIPI camera driver, which doesn’t require recompiling the camera driver every time the kernel version is updated. Although it is not V4L2 compliance, we provide rich set of API calls and example code for C/C++, Python as well as OpenCV and Gstreamer. Stereo camera is also supported for Raspberry pi compute module.
Prerequisites
- sudo apt-get update && sudo apt-get install libzbar-dev libopencv-dev
- sudo apt-get install python-opencv
Download and install the SDK library
- git clone https://github.com/ArduCAM/MIPI_Camera.git

- cd MIPI_Camera/RPI/

- make install

- chmod +x enable_i2c_vc.sh
- ./enable_i2c_vc.sh

Then click Y/y to reboot now
Compile the Examples
- cd MIPI_Camera/RPI/
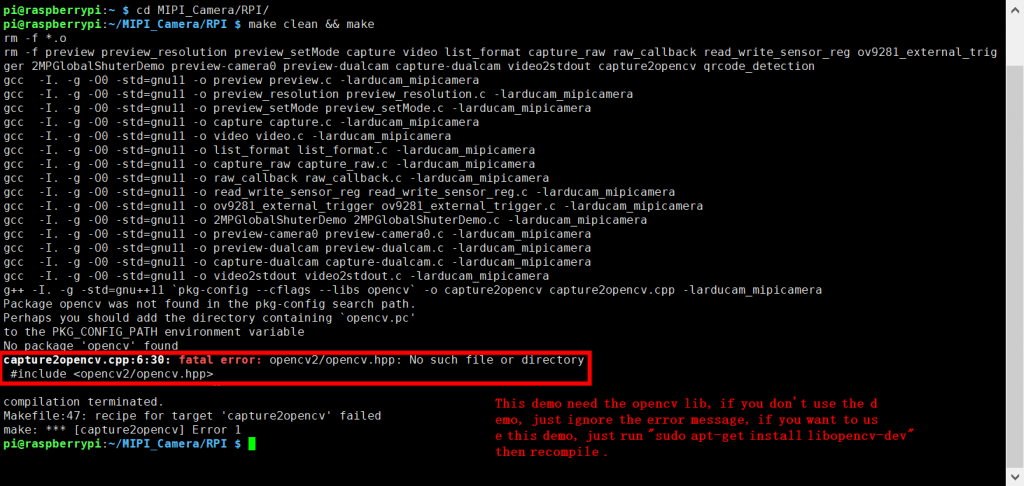
- make clean && make
How to use release demos? (use the imx298 as an example)
- arducamstill
This is a comprehensive application, user can use it to preview, get image in different format and fine tuning the image quality.
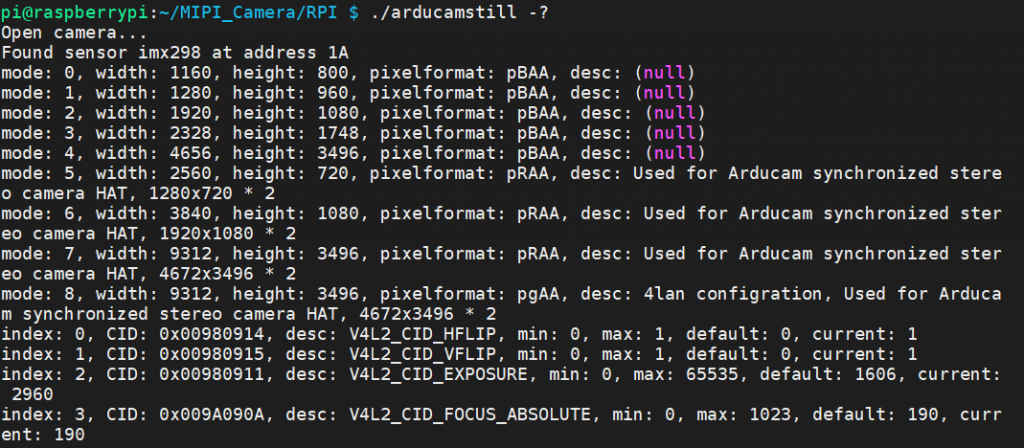
- get help
pi@raspberrypi:~/MIPI_Camera/RPI $ ./arducamstill -?
- Previdew in mode 1 and enable awb enable ae
- pi@raspberrypi:~/MIPI_Camera/RPI $ ./arducamstill -t 0 -m 1 -awb 1 -ae 1
From the print message, you can see the current mode framerate .etc
Current mode: 1, width: 1280, height: 960, pixelformat: pBAA, desc: (null)
[Framerate]: 02 pfs, [Exposure]: 2680, [Focus]: 0190,[Rgain]: 0140, [Bgain]: 0070
- Preview 5 seconds, then get a image in jpg format
pi@raspberrypi:~/MIPI_Camera/RPI $ ./arducamstill -t 5000 -m 1 -e jpg -o test.jpg
Capture higher resolution of image
If you want to modify the resolution(such as 8112 x 3040), you can use fmt = camera.set_resolution(8112 x 3040) to change the resolution in MIPI_Camera/RPI/python
Due to the increase in the amount of data, more space is required accordingly, please set the gpu_mem=400 in /boot/config.txt, and add the option cma=400M in /boot/cmdline.txt.
- Detail parameters
-t, --timeout   : Time (in ms) before takes picture and shuts down (if not specified, loop)
-q, --quality   : Set jpeg quality <0 to 100>
-m, --mode      : Set sensor mode
-awb, --autowhitebalance        : Enable or disable awb
-ae, --autoexposure     : Enable or disable ae
-rgain, --awbrgain      : Set R channel gian vaue <0 to 65535>
-bgain, --awbbgain      : Set B channel gian vaue <0 to 65535>
-o, --capture   : usd to get one frame
-e, --encoding  : Encoding to use for output file (jpg, bmp, gif, png,raw)
-?, --help      : This help information
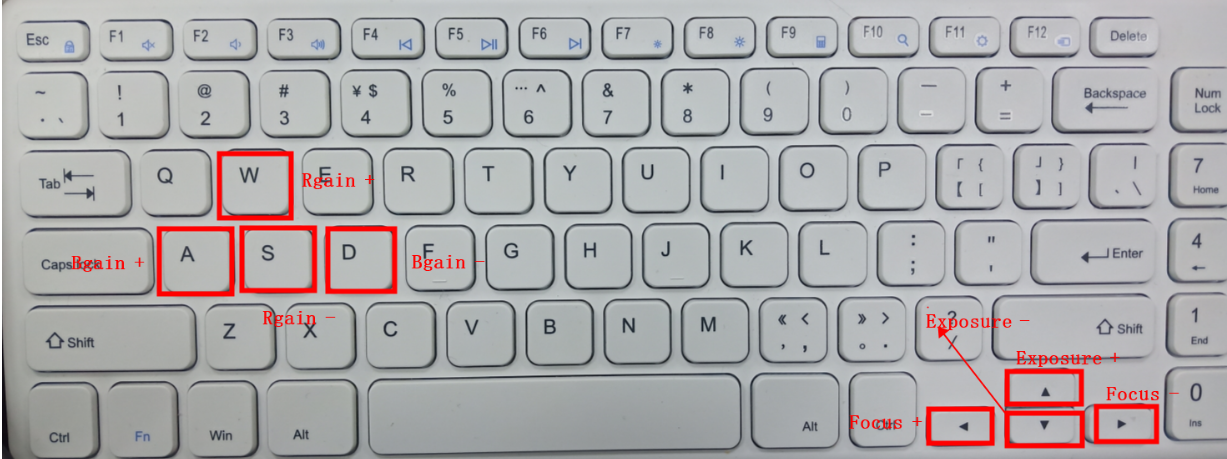
- Fine-tuning the exposure focus and gain using the keyboard
- After getting a good result, you can set the current value using arducam_set_control API. For the detail APIs, please refer to:
https://github.com/ArduCAM/MIPI_Camera/blob/master/RPI/arducam_mipicamera.h
- opencvGui
For the convenience of users to see the effect of fine-tuning intuitively, arduacm release a GUI application
pi@raspberrypi:~/MIPI_Camera/RPI $ ./opencvGui
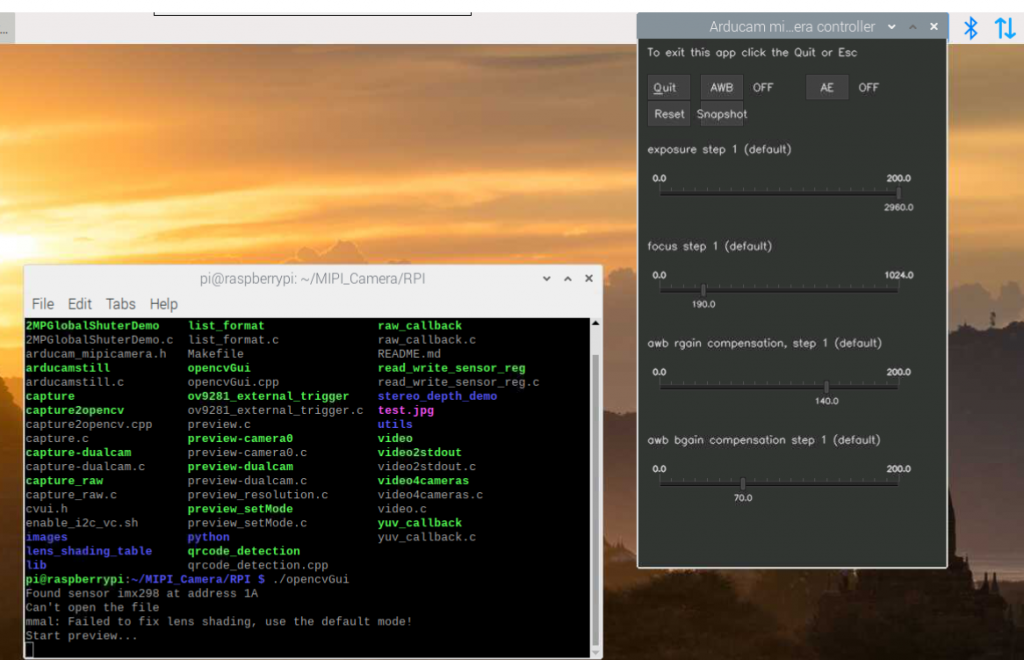
- Toolbar introduction
-Quit					: close the application
-AWB					: enable and disable auto white balance function
-AE						: enable and disable auto exposure function
-Reset					: reset all parameters
-Snapshot				: get one frame image
-exposure step 1 		: fine-tuning exposure time
-focus step 1 			: fine-tuning focus value
-awb rgain compensation : fine-tuning awb rgain compensation
-awb bgain compensation : fine-tuning awb bgain compensation
Press Ctrl + C to exit the application
- list_format
This demo is used to check all resolution the sensor you are using supports
pi@raspberrypi:~/MIPI_Camera/RPI $ ./list_format
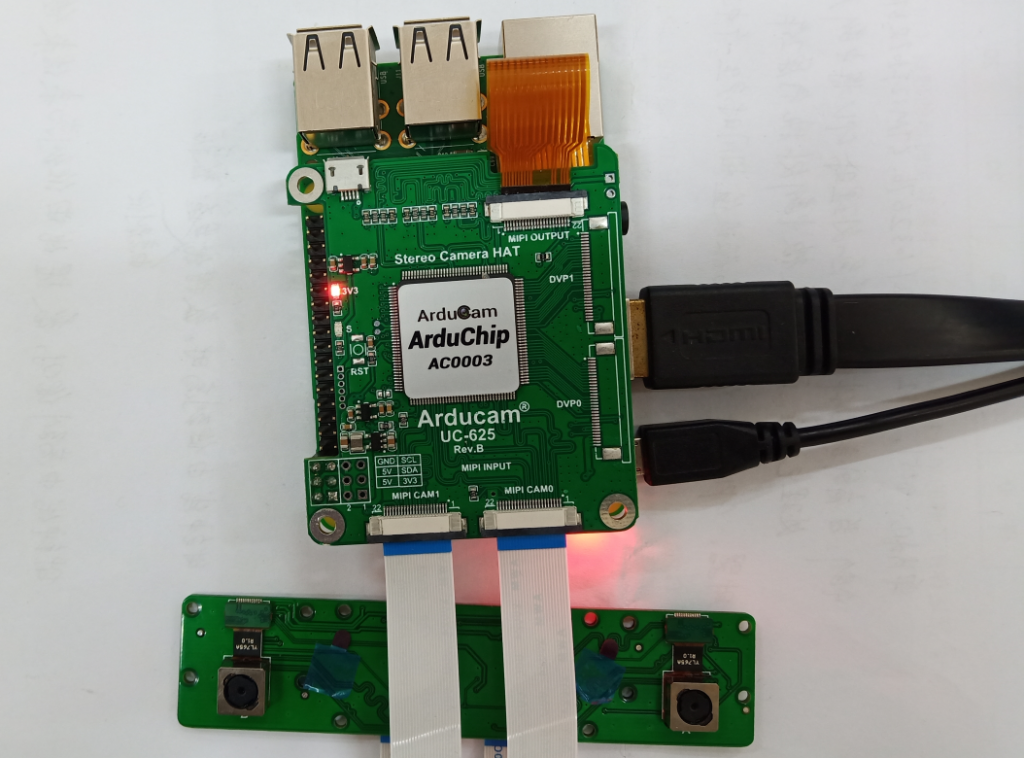
How to use Arducam stereo hat? (use the ov9281 as an example)
- Hardware setup
Run the ./list_format to check which mode is used for stereo hat.
- pi@raspberrypi:~/MIPI_Camera/RPI $ ./list_format
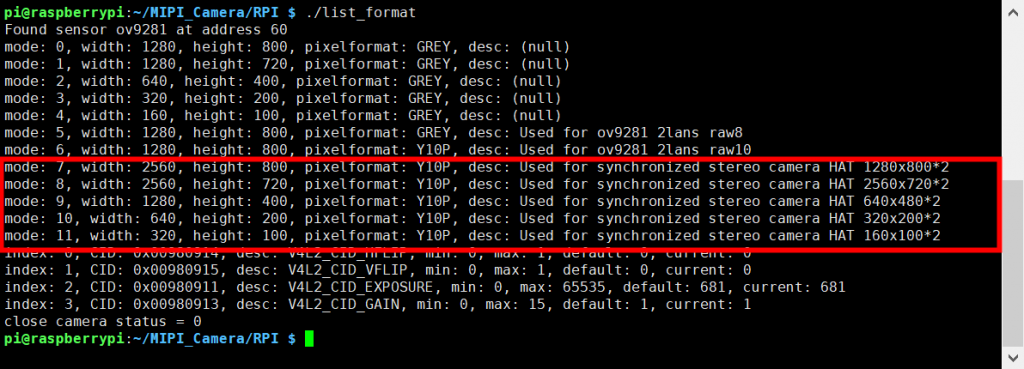
From the print message, we can see the mode 7-11 ared used for stereo hat. I choose the mode7 as a demo
- pi@raspberrypi:~/MIPI_Camera/RPI $ ./arducamstill -t 0 -m 7
Optional Settings
Edit /boot/config.txt file. Find gpu_mem=xxx line. Modify gpu_mem size with the proper size, recommend using gpu_mem=160 for 13MP camera board,
gpu_mem=180 for 16MP or higher camera board.
RUNNING THE EXAMPLES
Preview Example
$ ./preview
In the preview.c example, it will demo how to do a preview in different resolution and camera control parameters.
Capture Example
$ ./capture
In the capture.c example, it will capture different resolution JPEG images.
$ ./capture_raw
In the capture_raw.c example, it will capture different resolution none interpolation raw format images, especially useful for monochrome sensors.
$ ./raw_callback
In the raw_callback.c example, it is callback version of capture_raw example.
Video Recording Example
$ ./video
In the video.c example, it will record the video in H246 format.
Camera Control Query Example
$ ./list_format
In the list_format.c example, it will list camera supported resolution and control functions.
Sensor Register Read/Write Example
$ ./read_write_sensor_reg
In the read_write_sensor_reg.c example, it illustrates how to directly read/write sensor registers. This example might need to be modified according to the correct sensor register address.
OpenCV Example
$ ./capture2opencv
In the capture2opencv.cpp example, it converts YUV data to OpenCV Mat format, and displays as is.
Gstreamer Example
In the video2stdout.c example, it outputs H.264 video stream to stdout, and uses gstreamer to push the stream to PC.
Example 1: Raspberry pi side command:
$ ./video2stdout | nc -l -p 5000
PC side command: (x.x.x.x is your Raspberry Pi IP address)
$ gst-launch-1.0 -v tcpclientsrc host=x.x.x.x port=5000 ! decodebin ! autovideosink
Example 2:
Raspberry pi side command: (x.x.x.x is your Raspberry Pi IP address)
$ ./video2stdout | gst-launch-1.0 -v fdsrc ! h264parse ! rtph264pay config-interval=1 pt=96 ! gdppay ! tcpserversink host=x.x.x.x port=5000
PC side command: (x.x.x.x is your Raspberry Pi IP address)
$ gst-launch-1.0 -v tcpclientsrc host=x.x.x.x port=5000 ! gdpdepay ! rtph264depay ! avdec_h264 ! autovideosink sync=false
QR Code Detection Example
$ ./qrcode_detection <exposure_value>
In the qrcode_detection.cpp example, it illustrates how to use global shutter camera like OV7251 or OV9281 to detect QR code using OpenCV. To run this demo you have to install the dependence
sudo apt-get update && sudo apt-get install libzbar-dev libopencv-dev
Dual Camera Demo
$ ./preview-dualcam
$ ./capture-dualcam
In the preview-dualcam.c examle, it illustrates how to open the two camera ports on Raspberry pi compute module at the same time for preview. And the capture- dualcam.c examle, it illustrates how to do capture from each camera port on Raspberry pi compute module by switching between them.
A camera_interface struct should be constructed according to your hardware wiring.
For example camera port 0 is using sda_pin 28, scl_pin 29, led_pin 30, shutdown_pin 31, and camera port 1 is using sda_pin 0, scl_pin 1, led_pin 2, shutdown_pin 3.
More information about the compute module wiring please check: https://www.raspberrypi.org/documentation/hardware/computemodule/cmio-camera.md
UTILITY
How to playback the H264 file
Compile hello_video.bin
$ cd /opt/vc/src/hello_pi && ./rebuild.sh
Play H264 file
$ /opt/vc/src/hello_pi/hello_video/hello_video.bin test.h264
